|
Here is the formula which I have used already for many years:
2 liter distilled water
1 liter industrial alcohol (ethanol)
0.25 to 0.5 liter isopropyl alcohol
30 drops of liquid detergent and a few drops of wetting agent
The
number of drops of detergent and/or wetting agent depends on
the effectivity of the product.
Some washing detergents have lower values for ionic and non-ionic
tensides. So some experimenting is necessary.
Wetting agents are manufactured by various companies:
Photo-Flo
by Kodak, Mirasol 2000 by Tetenal, Ilfotol by Ilford.
Ask
your camera shop.
You
will get experience when you are cleaning many recods and you
may adjust, or alter the formula of the cleaning liquid.
Another
composition of the liquid which I use already since 10 years
now is the liquid formula advised by Keith Monks initially in
the 1970s. He advised to take equal parts of alcohol and detilled
water. I add a few drops of washing detergent and the liquid
is very effective and is less complex.
|
The
alcohol should be of the industrial kind without any additive.
This alcohol is cheaper than the
medicinal type bought in the pharmacy which contains a small percentage
of fat and is called 'spiritus ketonatus fortior'. Let yourself be
advised by experts from the art supply shop or the paint shop. Take
care because the isopropyl is very poisonous; you need ventilation.
And ventilation will also be to the satisfaction of friends who bring
their records for cleaning.
If
you cannot find the fat free alcohol, you may use the 'spiritus ketonatus
fortior' type which is always less greasy than some commercial record
cleaners with greasing additives. The addition of isopropyl is specifically
advised if you cannot find the fat free alcohol. Be sure that the
distilled water is really distilled water, the type you buy at the
pharmacy, not the demineralized water!
 Never use a glass cleaner or other aggressive product.
Use
a large plastic container that is big enough to hold 4 to 5 liter.
First put in the contents of two bottles
(2 liters) of distilled water and add the drops of detergent. Shake
very well. Than add 1 liter of the alcohol and if you wish a little
bit of the isopropyl alcohol. And again shake very, very well. By
shaking the container, the liquids will mix well and the detergent
will foam. After you have stopped shaking the foam will go away after
about 5 to 10 seconds. If it goes away immediately you probably have
not added enough detergent. You will notice this when you put the
liquid on the spinning record on the cleaning machine: the liquid
does not spread evenly. So, add a few more drops more and shake again.
But be careful not to put too much detergent.
Many
formulas work with the Keith Monks machine. You can try whatever combination
of ingredients and eventually adjust the formula according to your
experience and the audible results you obtain. You can leave out the
isopropyl altogether if you wish.
In general one wash will be sufficient to clean a record side. The
result depends also on the time you leave the record spinning under
the brushes. If
you use a Keith Monks or Loricraft, the time of the brushing of a
record side should be about the same as the time it takes to dry one
side.
If you
use a different machine do take some time to brush the record. Do
not forget to keep the record wet all the time while cleaning!
CHOOSE
ANOTHER TOPIC
It
is possible to play records wet with distilled water. It
will lower surface noise during play. At the same time however the
movement of the tip is somewhat reduced also. But that does not impair
the sound too much.
What
is important however if you play records wet, it is necessary to dry
the record before putting it back into the sleeve and cover. It is
better to clean the record after wet play. So that is where your vacuum
cleaning machine comes in handy.
Playing
wet is quite a hassle. Playing records using a special liquid like
Lenco Clean (cleaning solution) is
even more complicated and because of the viscosity of the liquid will
impair the transient in the signal. There will be a reduced attack
in the drum, the cymbal, the piano and other percussion instruments.
I strongly advise against the use of Lenco Clean
or similar product. There are other solutions
to arrive at a reduced noise floor and a more controlled signal. Try
a Record Stabilizer Weight or a Stabilizing Ring.
CHOOSE
ANOTHER TOPIC
|
The
Use of Turpentine and Sticker Remover: Stickers, Glue, Dirt.
|
 Do
not believe the so called expert who advises you to use a window or
glass cleaner, or a bathtub product to remove dirt from the record's
surface. Never use these products. Also do not use solvents, thinners,
etc. for removing paint, glue or whatever is sticking to the vinyl. Do
not believe the so called expert who advises you to use a window or
glass cleaner, or a bathtub product to remove dirt from the record's
surface. Never use these products. Also do not use solvents, thinners,
etc. for removing paint, glue or whatever is sticking to the vinyl.
There
are only a few liquids that you can safely use: industrial alcohol,
methylated spirit and turpentine.
Especially turpentine is useful for removing stickers (if you do not
use a commercial sticker remover from the chemist's), and for dissolving
and removing glue or a drop of paint stuck to the precious record.
What to do?
Go to the art supply shop and buy a brush. I use the Royal Talens
6 - 350. It is a relatively soft brush, but the hairs are sturdy enough
to rub against any glue or drop of paint, or whatever is on the vinyl
and needs to be dissolved and removed.
For
removing stickers: dip the brush in turpentine, press the hairs against
the bottle's opening to remove excess liquid and wet the sticker on
the record cover with the brush. Leave it for several minutes. Then
you can try to pull at a corner of the sticker and see if it detaches.
If not, apply some turpentine again and let the sticker soak. It may
be necessary to use just a little bit of force. But be careful! If
the sticker can be taken off, the cover will show some residue. Just
brush that spot once more and then use a paper tissue to wipe off
the rest of the turpentine, sticker and glue. If a stickers is put
over another sticker, you will have to repeat the procedure for each
sticker.
Turpentine should not be used on the jewel boxes of CDs!
There
are stickers that do not soak up the turpentine because the surface
is not porous, as is the case with "golden" stickers. These
cannot be removed with any liquid and need some warm air from a hair
dryer or should be held carefully over an open fire (stove). If it
does not work, leave the sticker on.
Also be careful if you want to use turpentine on very old printed
cardboard/Kraft covers, because it may dissolve and smear the old
printing ink.
Turpentine
can be safely used on laminated covers and actually most modern covers.
If some of the turpentine is soaked up by the Kraft, cardboard or
paper, just leave it, it will eventually vaporize. Turntable
can of course be used on vinyl also. It is however greasy and you
should clean the record very thoroughly again after serpentine has
been applied.
I recently acquired a few first pressings of a vintage label. They
had been advertised as being unplayed and unopened. However three
of the five albums had been opened and glue of the sticker was smeared
on the vinyl over a wide area. There turpentine possibly could help.
I
soaked the brush in the turpentine and gently moved the brush over
the large spot and let it soak. After a while I moved the brush again
over the area, always parallel to the groove, waited again and repeated
the action. The glue was dissolving gradually and nicely, and I could
wipe it off with a tissue. After that of course I applied turpentine
once again. All residue had to be dissolved and removed. This has
to be done carefully and with patience. But the reward can be that
the record surface will be neat and the groove can be played again,
only of course after a few cleanings on the machine.
Another
disc had a sort of debris in circles stuck to a wide area. I was not
sure whether this could be removed or if it was not vinyl grain and
the groove was really damaged by playing it with a worn needle. The
only way to be sure was to apply turpentine with the brush. Again
I moved the brush in circles. Very gently. Than waited some time and
with the brush I could take off the residue of the pressing which
was made 50 years ago. And finally I could use the tissue to soak
up the rest of the turpentine. After that the disc needed two cleanings
on the machine. Surfaces of the other discs were also showing some
residue -they were first pressings that never had been played- and
before cleaning the record on the machine it was the turpentine that
helped.
That is why I generally do not buy factory sealed records. I only
buy them if I know I can trust the seller and the record can be returned.
'Factory sealed' is definitely no guarantee that they are MINT. Actually
they can be less than pristine. In some cases even the seller may
shrink-wrap the item.
Always remember: Before cleaning
a record on the cleaning machine, in the basin, or by hand, do always
clean the record with a carbon fiber brush and if necessary with a
soft velvet record brush before wetting and/or spinning the record.
Get rid of all the dust and debris without applying force. And if
this advice and these methods are new to you and you want to be sure
that they work, try it first on an 'old' record. Once you have learned
what you can and what you cannot do, you can start treating your precious
discs.
CHOOSE
ANOTHER TOPIC
|
Removing
Stickers from Labels and Albums.
|

If
there are stickers on the record label, I would advise you to leave
them there and not to manipulate them, because the situation only
can get worse. But if you insist...
Removing stickers can be done by using a special sticker remover,
a solution which can be found in the drugstore or a specialized shop
with office or art materials. You better try the effectiveness of
this liquid on a dispensable record/record cover. Sometimes a label
is easily damaged. Apply the liquid and let the sticker soak for some
time. Then carefully try to lift the sticker at a corner. If it is
not detachable, do apply some more liquid and take more time.
You
can combine this method with the use of a hairdryer if it concerns
a cover. The hot air will generally soften the glue so the sticker
may come off easier. If it is a sticker on a label you can try the
same liquid. Sometimes labels are made of hard plastic or gold. Those
stickers may have a hard upper layer which makes soaking difficult.
Then the hairdryer comes in handy. Place a cardboard roll (the basis
of a wide packaging tape) on the label, around the sticker. Do not
position the roll over the dead wax or over the groove. Now hold the
hairdryer in the opening of the roll and blow hot air for a few seconds
inside the roll. Check if the sticker can be lifted at the edge. Do
this carefully. Do not use force. Then blow again for 5 seconds. Try
to remove the sticker a bit more. And so on and so forth. You probably
can also try the hairdryer method without the use of the sticker remover
solution if the remover does damage the color of the label. But that
can be a dangerous affair.
The
special sticker remover liquid can probably also be used for removing
ink. Try again on a dispensable record. I can not give you a brand
name of the sticker remover as every country has a different brand
name and probably a different composition of the liquid.
The
use of a hair dryer is not necessary if lighter fluid is applied.
Dan Prothero from San Francisco wrote:
"I
use Ronsonol brand fluid and it quickly unseats most any sticker from
any surface including vinyl LP labels. Just a few drops onto the sticker,
wait 30 seconds, and it peels off neatly. Any residue is easily removed
by wiping with a cloth that contains another few drops of fluid. Lighter
fluid works on uncoated stickers the best, but it's worked for me
on almost every sticker. If the sticker is metallic then the fluid
obviously wont penetrate it from above, but it's likely you can get
at it from beneath.... soak the sticker edges first, wait, then re-soak
and start peeling towards the center. repeat the process until it's
all off. don't rush it or you can pull up the paper with un-loosened
adhesive. My dad collects stamps and he uses lighter fluid on his
stamps to verify watermarks. It evaporates without a trace in about
a minute. it has never damaged his stamps, and so it should be considered
safe on LP labels too."
Always remember that I am not responsible
for any accident or damage of a record or label if you experiment.
Always let the record cool down gradually, never put a "hot"
record or record label under the cold tap. You can use this method
first with an old record that you would dispose of anyway. Do not
do it on a collectible item without having experience and without
knowing what the result will be. In most cases it is better to leave
the sticker on the label. The success of this method also depends
on the sort of paper used for a label.

CHOOSE
ANOTHER TOPIC
|
Does
Cleaning Damage The Vinyl?
|
Some
people claim that cleaning a vinyl record will damage the groove.
Somebody wrote in a forum that he had
talked to people from a record company and these people said that
a record should never be cleaned with liquids, even if these liquids
have been specifically designed for vinyl record cleaning. But what
if you have a really dirty record that you want to play and you do
not want to damage the fine, polished diamond tip? Some people argue
that these record producers want vinyl records to sound mediocre,
so the CD will be more appreciated and the new SACD will count on
new enthusiasts who have enough of bad sounding, romantically crackling
records.
There
is much turbulence going on when a stylus follows the groove. A record
can collect small particles of dust and will get dirty in time. Before
playing a record it needs to be wiped gently with a soft velvet brush
or with one of these special carbon fiber brushes. Naturally these
brushes are only effective if the record's surface is relatively clean.
A
few months back there was a guy on the market who was selling a lot
of old records. I overheard him advising a client. He said that the
record should be cleaned with window cleaner. I corrected him and
from now on he no longer advises his clients to use window/glass cleaner.
Using glass cleaner definitely will ruin the vinyl. Never use that
stuff, it takes of the shiny glow of the vinyl and gives persistent
hiss and background noise. You easily can distinguish such a disc
from a copy not being cleaned with aggressive glass cleaner.
And
there is another possibility that a groove may be damaged. But
that is during the cleaning process and you do not dust the record's
surface with a carbon brush and get rid of dust and debris first before
applying the liquid. Many people just put the record on the cleaning
machine and start cleaning,. They forget that the dust and particles
will be accumulated by the cleaning brush and will ride over the vinyl
and in the groove, round after round. You can imagine what the result
is.
Cleaning a worn record will show a bad groove to advantage.
But playing the record after the cleaning process, and then cleaning
it again, may actually improve the groove. Only of course if the groove
suffered from dust and dirt. Not if it has been damaged by a worn
stylus tip. Then a record can not be bettered.
The
climate in the listening room has its influence also. Heavy smokers
should not be invited. Heavy smoking is not advised. The record can
collect greasy particles which float in the air.
Not carefully slipping the record in its sleeve after play will increase
the possibility that it collects dust and gets dirty.
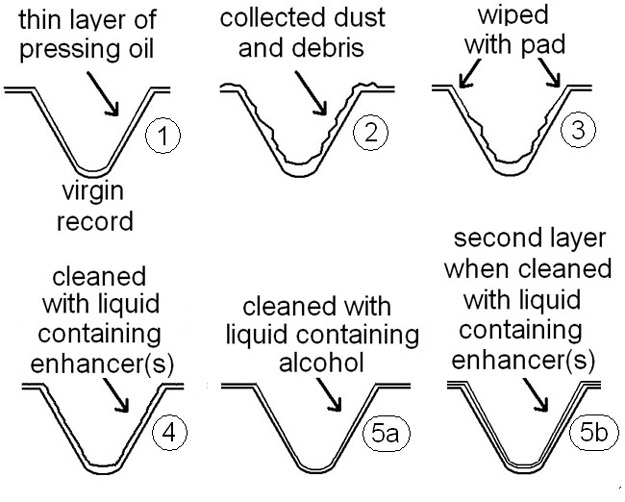
And as said earlier: the use of grease/oil during the pressing process
in the factory is a necessity so the matrix and the vinyl record can
be separated easily. But the fat or oil hardens when the record cools
off. This hardened grease can give a ticking sound or a sound as if
there is a bump or other unevenness in the vinyl. Especially in the
nineteen seventies the application of the pressing oil or fat was
not always done carefully. Many buyers and also the personal in the
record shop thought that the records were damaged and traded them
in and they were sent back to the factory.
If
a record sounds bad even after cleaning, the groove must have been
damaged by playing on a bad turntable. Or the plastic of an old inner
sleeve may have been in contact with the vinyl over decades. Another
possibiliy is that the record can never be improved because the vinyl
is of bad quality and is not pure enough and contains a high percentage
of filler material. Such a record can hardly be improved.
And
last but not least, sometimes when pressing 180 gr. records, the matrices
and the vinyl have not been heated enough and the vinyl did not "flow"
during the pressing process. So the surface has a "bump"
or can have "loose particles" which will be transported
by the cleaning brush of the machine; especially if it is a sturdy
nylon brush.
The
only remedy to restore the signal of a dirty record is cleaning the
record with cleaning solutions. And these should be safe! The cleaning
solutions advised on this page will help you to restore the quality
of many records, in some cases completely, in others only to some
extend.
Do
not forget to clean the brushes of your cleaning machine from time
to time by letting them soak overnight in a basin with water and with
ample washing detergent added. Rinse them thoroughly the next morning,
and dry them with kitchin paper.
Does
cleaning a record damage the vinyl? When did you stop washing your
hair?
CHOOSE
ANOTHER TOPIC
It
is very important to use the right kind of brushes that scrub
the record in a safe way. Some replacement brushes can be very
costly. If you do not want to pay $ 50 for a replacement brush,
I advise you to buy the supple Knosti Antistat brushes or the
Okki Nokki brushes which are made of pig's hair.
|
I
have used the Okki Nokki brushes with good results. In order
to mount these in the grey holder of the KM machine, the thin
black part of the brush has to be cut in height and the space
has to be filled up. So these brishes will fit and can be clamped
in the holder. If you are handy you certainly will find a way
to mount these or the Knosti brushes. The Knosti brushes can
be used for a longer period of time than the Okki Nokki depending
of how many hundred records you will be cleaning.
|
CHOOSE
ANOTHER TOPIC
|
Is
it Possible to Repair a Seam Split?
|

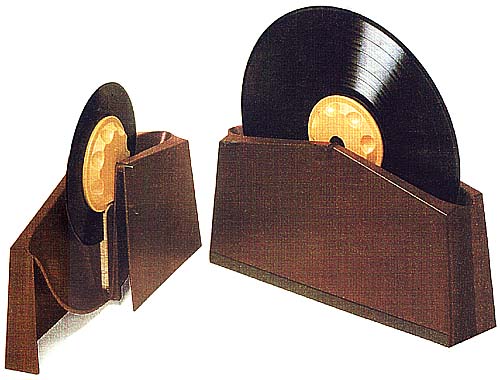
Seam
splits are a nuisance. They can get longer and longer and they
can damage the record if the inner sleeve is not new and does
not protect the rim of the record. The drawings show what can
be done. Of course, it is not easy. But if you are handy, you
will experience here too that practice can make perfect.
Take a long piece of 200 gr. paper or Kraft. The length should
be a little more than the split. Fold it along its length. See
to it that the paper stays folded. If you want to make it last
forever you can cover it entirely with a piece of wide transparent
adhesive tape. Then fold it again. Now cut the piece more or
less to the needed size. Fold it again, so it will better remember
the fold. Spread it out on an old newspaper and then put on
the glue and smear it out.
Now
comes the difficult part and that is slipping the piece into
the inside of the cover. You can bend the cover somewhat and
than put the piece in place. If you can get some help it will
make things easier. Clamp the seem for some time.
This method works best with covers made of thin cardboard or
Kraft. For sturdy, thick cardboard you could probably fold the
piece that you want to insert over the edge of a ruler and than
carefully move the ruler to the desired spot.
|
|
|
CHOOSE
ANOTHER TOPIC
|
What
if You don't have a Vacuum Machine?
|
|


 Using
the Keith Monks Record Cleaning Machine, the Loricraft PRC, the Knosti/Disco Antistat,
do the cleaning by hand, or construct an effective and safe cleaning device yourself...
Using
the Keith Monks Record Cleaning Machine, the Loricraft PRC, the Knosti/Disco Antistat,
do the cleaning by hand, or construct an effective and safe cleaning device yourself...
 I
have also overheard talk (and have read comments) of collectors who
think that cleaning a record for longer than two turns is a waist
of time. Do they have to catch a train?
I
have also overheard talk (and have read comments) of collectors who
think that cleaning a record for longer than two turns is a waist
of time. Do they have to catch a train?


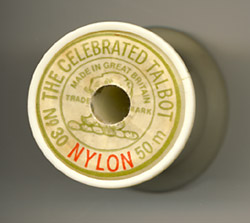 The
best option for a buffer thread is the nylon thread as it was
originally used by Keith Monks. It came from England and was The
Celebrated Talbot No. 30. Not solid but the braided type. This
make is no longer available. Many owners of Keith Monks and of
Loricraft machines have been experimenting to find a solution.
The
best option for a buffer thread is the nylon thread as it was
originally used by Keith Monks. It came from England and was The
Celebrated Talbot No. 30. Not solid but the braided type. This
make is no longer available. Many owners of Keith Monks and of
Loricraft machines have been experimenting to find a solution. Doing
some experiments can do no harm. Always try on an old record as
with some threads the vinyl could probably be damaged. The best
option is to find a manufacturer of nylon thread or just ask Keith
Monks or Loricraft.
Doing
some experiments can do no harm. Always try on an old record as
with some threads the vinyl could probably be damaged. The best
option is to find a manufacturer of nylon thread or just ask Keith
Monks or Loricraft.


 Initially
I did repair the chokes but found it more convenient to just apply
the liquid on the record's surface by using a small plastic dispenser.
The extra advantage is that you can shake it before aplying so the
liquid will be well mixed.
Initially
I did repair the chokes but found it more convenient to just apply
the liquid on the record's surface by using a small plastic dispenser.
The extra advantage is that you can shake it before aplying so the
liquid will be well mixed.