|
|
 |
 |
hobbyists's views for hobbyists |
© Rudolf A. Bruil - Page first published on the www in August 2001.
|
Warning:
Thanks to hosting company ARVIXE, my pages on soundfountain.com are in disarray. Arvixe moved the server from Texas to Provo, Utah without warning and without providing the necessary codes, password and server address, while the yearly payment had been made and acknowledged by Arvixe for the period until October 2023. We certainly hope that the inconvenience to you, the visitor, will gradually end as the pages are now hosted in the Netherlands. |
These pages are for serious music listeners and are best viewed on a desktop, a laptop and a tablet.
|
Choose a subject (or just press Ctrl + F and type a key word or phrase):

|
Thorens
TD124 Mk II with Ortofon RMG 212 tonearm and Ortofon SPU cartridge on
ST 104 base in graduated gray tone as published in Joachim Bung's book "Swiss Precision". Image courtesy Sebastian Schiele, owner of this turntable. |
Introduction
 |
TD-124 and TD-124Mk2 Do
you own a Thorens TD 124 or TD 124 Mk2? And do you have the original
manual? And maybe you do know a lot about your TD124? |
 |
ORTOFON On
the upper left you see the first TD-124 with the long SME 3012 arm and
the Ortofon SPU-GT cartridge in an early |
 |
TD-124 MK2 It
is a combination of a belt drive and an idler wheel drive. The TD124
has 4 speeds: 16 2/3, 33 1/3, 45 and 78 RPM. These speeds can be adjusted
which is great for people with absolute pitch, for those musicians who
want to play along with a recording without having to tune their instruments,
and for the playing of shellac records which are not always engraved
at 78 RPM but have different speeds up to eighty or even higher RPM. |
|
|
TP-14 ARM The TD-124Mk2 has a more modern styled frame and the turntable mat has fewer rings which are interrupted and a new arm, the TP.14, which replaces the earlier BTD-125 arm. But the most important aspect is that the app. 4.395 kg weighing iron platter could be replaced on request by a 3.63 kg. platter of aluminum which of course is non magnetic and thus does not attract a heavy moving coil cartridge with a strong magnet. The TD124mk2 was described by R.L. West in his review for HiFi News of July 1966: "The
TD.124 has long been recognized as the Rolls-Royce of transcription
motors. It is as solidly made as our Garrard 301 and 401, but has one
or two special features of merit. The Garrard takes its drive from a
stepped pulley on the motor via a rubber-tyred idler to the turntable.
The Thorens interposes a light flat rubber belt between the motor and
the separate stepped pulley which drives the idler. This stepped pulley
is solid with the main frame, and so prevents any motor vibration ,
whatever its direction, from reaching the turntable via the drive. (...)
|
 |
BEOGRAM 3000 The
TD-124Mk2 was soon recognized as one of the most sophisticated transcription
turntables available on the market. Both Bang & Olufsen (B&O)
from Denmark and
|
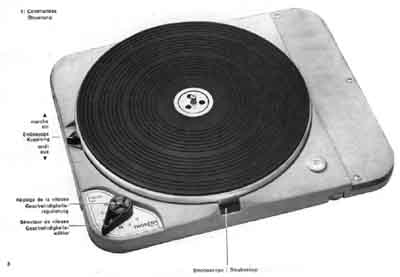 |
4 SPEEDS This is a picture taken from the instruction manual of an early TD 124. The armboard did not have a black coating yet. When the 16 2/3 speed was proposed in the mid nineteen fifties many manufacturers incorporated the speed into their gramophones and turntables. Right from the beginning the TD 124 also had 16 2/3 rpm which was meant for recordings containing speech and was really not suitable for high fidelity. Note: The aluminum platter which later could be ordered has only 2 stroboscope rings for 16 2/3 and 33 1/3 respectively. It goes without saying that if you have to adjust the downforce of a cartridge when using an iron platter, you have to place the scale not on a record but directly on the rubber mat to get a more exact reading. If you just turn the counterweight to the desired marking when the arm is away from the platter's periphery, or placed on the rest of the lift, you will get a faulty result! |
 |
BELT DRIVE AND IDLER WHEEL The
TD-124Mk2 had a more modern look but the combination of a belt driven
pulley and a rubber idler wheel of the original TD-124 was of course
retained and the heavy platter is turned with the same minimum of wow
and practically immeasurable flutter. Rumble values are also exemplary.
That is if the bearing functions perfectly well, if the rubber belt
is not damaged and not too loose, and if the motor is well de-coupled
from the main chassis by three sets of two rubber rings/grommets. The
player should be decoupled in some way from its surrounding by means
of rubber insulators (originally the mushroom-shaped insulators), or
if placed directly on a stand, the stand should have spikes or cones
(spikes are preferred). Also the table should be level at all times
to function well. See also |
 |
VERSATILE MACHINE The design, the sturdy build, the specific features no other turntable had, and the precision with which each and every TD-124 was manufactured, made this turntable about the best a man could get. Serious music lovers and audiophiles alike were very fond of this transcription turntable and combined it with tone arms from Ortofon and SME, and with cartridges from Shure and Ortofon. At
left an advertisement from 1961. It was published in the April
issue of High Fidelity magazine in the US. By that time Thorens products
were imported by Elpa Marketing Industries Inc. They also imported Revox
tape recorders. An advertisement from 1960 did not mention Elpa Marketing
yet. The cost of $99.95 for the TD-124 is amazing, at least measured
by non-American standards in that era. The dollar was a strong currency
with a high exchange rate. $99.95 for a unit to be built in a cabinet
or to be mounted on a plinth are peanuts today. "Thorens compensates for variations in house current and recording systems; gives the truest reproduction with all your records, old or new. Adjustment is so fine that records can be used to accompany live vocal and instrumental performances. Swiss precision engineering ensures longer record life, performance to match the finest components you will ever own." The
Thorens TD-124 was in the nineteen fifties and sixties what the It takes some attention and knowledge to keep a TD-124 up and running satisfactorily. The die hards know how to service the mechanism and treat the machine with care, and they eventually substitute one part or another, if necessary: a new idler wheel, a belt, a better spindle and bearing, and maybe a platter. Others just own a TD-124 because they consider it as an antique object and do not bother much about the proper functioning. In any case the paragraphs that follow can give you more insight and ideas in order to fully enjoy the working of this turntable. |

The Idler Wheel and The Specifications
 |
VALUES For his review in HiFi News, audio journalist R.L. West meticulously measured the parts and the functioning of the TD-124 Mk2 and compared these data to the measurements on his 4 year old original TD-124. The platter of the Mk2 weighs 8 lb (3.63 Kg). Of course he did not want to weigh the platter of the first TD-124 as this would mean taking the platter off the frame. The
spindle is the heart of the matter. Machining it with close tolerance
is of the utmost importance. The spindles of the TD-124 and the TD-124
mk2 measured 0.2824 inch and 0.2822 inch respectively. It is unlikely that the polished hard steel spindle will show wear from years of turning. However, the relatively soft sinter bronze bushings can give way to the pressure of the spindle and the turning during decades of service, especially if the machine is not level. |
 |
CENTERING THE PLATTER In
case you have bought a new spindle and bearing from Schopper or have
a new bearing housing made by a machinist, you will have to insert the
spindle (axis) into it. Also if you disconnected the spindle from the
platter, you would need a measuring instrument to calibrate the platter
the way it was done in the Thorens factory. Naturally the calibrating
was done on the inside of the rim, there where the idler wheel touches
the platter and where the precise centering is the most effective. In
the picture at left it is shown how it was done. |
 |
CARPENTER'S EYE How
do you center the platter?
Many of you owners have of course found out the best method of checking
the correct centering of the platter by using a calibrating instrument.
But what if you do not have access to such an instrument? First of all
you need a carpenter's eye. |

|
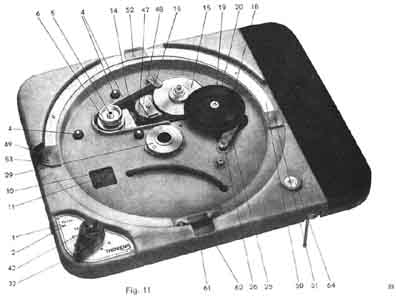
IDLER WHEEL This drawing is from the original manual of the TD 124 Mk2 and tells you how the adjustments of the idler wheel should be made. If your TD124 works perfectly well and you see to it that the adjustments are right, than there is obviously no need to make changes. The well functioning also depends on other adjustments and the cleaning of some rotating parts. |
  |
CLEAN The speed selector has idle positions in between the speeds. If you do not play, always set the selector in between two speed markings. In this way the idler wheel will not touch the stepped pulley and will not risk to loose a perfect round shape. Clean the periphery (edge) of the wheel with cotton wool and blue methylated spirit. |
The Spindle and Bearing Housing
|
|
PRECISION BEARING The platter of the TD-124 fits directly on the flange on the top of the spindle and is secured by three screws. The shaft (spindle) is turned and polished to the highest degree of precision. |

|
IRON AND ALUMINUM PLATTERS The aluminum platter does not have the same shape in the center. It needs an intermediate disc to fill up the original space between flange and platter. The intermediate disc is secured by the three original, large screws. The platter is fixed to this intermediate disc with three smaller screws. |

|
TEFLON AND SINTER BRONZE This is a drawing to portray the design of the heavy main bearing and shaft without which the turntable does not have the high end quality. The precision turned spindle is polished to the n-th degree and fits with a low tolerance in the 2 sinter bronze sleeves. If the bearing needs maintenance, it should be cleaned with oil. The earliest TD124 turntables had Teflon sleeve bearings (instead of the sinter bronze bushings) and needed to be cleaned with methylated spirit (blue alcohol) if cleaning was necessary. The recommended oil. If the Caltex or Texaco Regal Oil B (as used for hydraulic power transmissions) as indicated in the manual is not available, use a non oxidizing, non sticking, high grade light mineral oil (SAE 20). |
|
|
BEARING HOUSING If the bearing and the shaft are not handled well, the specifications will not be met. It is of the utmost importance that the housing is hermetically closed at the bottom so that the oil can not leak and the spindle hangs as it were in the oil bath so it is perfectly centered and will turn evenly. |
 |
BALL BEARING The ball was kept in place by a circlip (a washer which is a ring of thin, flexible metal) which clamps into the cavity at the bottom of the shaft. This cavity was greased with dark reddish bearing grease. That was the case with the second hand TD-124 (Mk 1) which I bought in 1978. Later models I bought did not have this grease bearing. |
 |
HERMETICALLY SEALED HOUSING If
the oil can leak, the spindle is not supported evenly by the oil and
cannot do its job properly. When
in 1980 a friend and I were developing a turntable with a heavy platter,
we initially used TD 124 bearings and spindles. We were thinking of
making more tables than just two. So we asked a factory what the price
of these parts would be. Recently I found the measurements he wrote
down when measuring the parts during our initial conversation. |
|
The bearing shown above was made by an expert technician from Huntington Beach, California, who sold specific items for the TD124 in the past. |
MAINTENANCE AND REPLACEMENT Maintenance is important. Clean the bearing and the shaft with oil. Cut a new circular gasket out of plastic sheet. Put it on the bottom of the still empty housing and with the end of a pair of scissors you make the three holes. Just a small hole will suffice and work better than a large hole. Now put the original, gray, plastic bearing plate (which supports the ball) in the housing. Then put on the plastic gasket with the holes right on the spots were the screws will be inserted. Put the base plate on and insert the 3 screws. Fasten the screws carefully and fasten them tightly. Replace the housing in the chassis of the TD124. Fill it with oil for about 1/3 and gently place the spindle (the platter attached to it) in the shaft and let it slowly settle by itself. Do not force the spindle to go down. The spindle cannot be exchanged for a new one without going to great expense. But if the bearing housing does not support the spindle as it should, if there is some play, it is less costly to have a new bearing housing or sinter bronze bushings made. |


The Motor and The Suspension
 |
MOTOR This
is what the original motor looks like. This motor was taken of an old
machine which could not be restored. One of the shafts for the suspension
was broken and the aluminum plate (mounted between pulley and motor)
is missing too. |
|
|
PABST AUSSENLAUFER For
several years the factory had enough spare parts for the TD124 in stock
for replacement and servicing. Despite its sturdy built, the motor of
the TD124 could have worn out if the machine was ill treated or accidentally
damaged. In 1977 the factory ran out of motors and a new motor was designed
especially for the TD124 by the renown manufacturer Papst. This motor
was a so called "Aussenlaufer" with the advantage of the flywheel
effect. (A similar type was used in the early Acoustical 3000 belt drive
turntable, but then with a large capacitor to start the light platter
instantly.) |
.") |
DECOUPLING This picture shows how the rubber isolation rings should be placed in order to attain a maximum isolation. From bottom to top: Hartpapier-Scheibe (hard paper ring), Gummitülle (rubber ring which is inserted in the chassis), Gummitülle (rubber ring), Hartpapierscheibe (hard paper ring), Sprengring (locking ring). Because of the different electrical parameters a new connection diagram was supplied.
|
 |
TWO KITS It
is possible that you may come across such a fairly new motor. Two
different motors were manufactured: kit 3805-200 for 200-240 Volts/50
Hz. and kit 3806-110 for 100-125 Volts/60 Hz. |
|
|
CONNECTIONS This
is the circuit diagram showing how to connect the two different Papst
Aussenlaufer motors. Steve Clarke from The Analog Department was curious about the workings of the Papst motor and built it into the TD-124. He gave a thorough evaluation of the electrical, mechanical and audio related aspects. Though the TD-124 remains an idler wheel turntable, it shows that every aspect of a design contributes to the audible results. Steve noticed a significant difference in sound with the Papst Aussenlaufer motor. This does not necessarily mean that the new motor is in itself a bad design. It means that it should be implemented in a different way or just not in the TD-124. An
idler wheel drive is not the same as any idler wheel drive. That is
why a Garrard 301, a 401 or a |
 |
MUSHROOMS With four insulators shaped like mushrooms, the chassis can be de-coupled mechanically from the plinth. Here you see the original rubber mushrooms. Visitors of this page often ask me if new ones are available and where to get these. Browse the www or check eBay. |
 |
IMPROVISATION You can of course manufacture some insulators yourself from pieces of rubber tube and top these with small rubber discs and glue these together. Some people just let the chassis rest on the wooden base as I do. But then it is important that the audio rack or cabinet is well de-coupled from its environment by means of spikes or similar gadgets. The turntable has to be level at all times. The horizontal position of the chassis can easily be adjusted by turning the wheels on the threaded bars. |
 |
HORIZONTAL ADJUSTMENT The suspension system of the TD 124 is in essence a simple system, but ingeniously designed. The chassis has threaded holes in which the threaded bars can be screwed. Discs have also threaded holes and can be turned to obtain the best position. By turning the discs clockwise the distance between chassis and plinth is increased. These discs rest on top of the mushrooms. In order to not damage the top of the mushrooms, intermediate rings have to be placed on top of the mushrooms. |


The Platters and The Clutch
 |
SIX PADS The main platter has 6 small rubber pads. These are there to support the aluminum top/sub platter in the playing mode. That is when the aluminum top/sub platter is lowered by disconnecting the clutch from it. |
 |
LIGHT ALUMINUM PLATTER It
is possible that the clutch does not work correctly. Maybe the aluminum
platter is somewhat round on top, overall, or just partially. In that
case it will touch the clutch in the up and in the down position. |
|
|
THE WORKING OF THE CLUTCH The clutch has the shape of half of a circle. It is a strip which should not have a bend. Check if the clutch is bent or torted. If it is, flatten it. The clutch can of course be adjusted. The drawing (below) shows the functioning of the device. For better understanding you can save the drawing and view it in detail when necessary. There are three screws with a specific shape. If one or two are missing try to find the same or similar ones with the same diameter and thread. Have one end turned by a machinist exactly to the shape of the original screws. In the playing mode, the holes of the clutch fall over the top end of the screws. That means that the clutch is in the down position. By moving the knob of the clutch away from you, the clutch will be lifted and will rest on top of the screws. This means that the aluminum sub platter is resting on the clutch and is lifted also, just enough to let the main platter turn freely underneath, without constraint. If the platter is not turning freely, the locking nuts have to be turned loose and one or more bolts have to be turned as to protrude more. This adjustment is rather delicate. And you only have to make the adjustment if the strip is not bend and only if the former owner has adjusted the bolts unwisely. When playing a record, the sub platter should never touch the clutch. |