|
|
 |
 |
|
© Rudolf A. Bruil. Page first published January 8, 2004.
|
|
|
|
|
|
© Rudolf A. Bruil. Page first published January 8, 2004.
Servo Control, Parallel (Linear) Tracking,
Minimal Lateral Tracking ErrorEdison - Rek-O-Kut - Ortho-Sonic - -BJ - Marantz - Pierre Clément - Harman Kardon
Garrard - Acoustical - Revox - B&O - Goldmund - Mitsubishi - Cartridge Man - Rabco

© Rudolf A. Bruil. Page first published January 8, 2004.
Jump to:
Linear Tonearms

Technics
SL1100 with Rabco SL-8E Linear Tracking Tonearm and
Universal Record Stabilizing Ring (RSR) plus Universal Stabilizer Weight.
|
|
|
EDISON When
Emil Berliner proposed the "Grammophon", the technique of
parallel tracking was abandoned overnight. Now the radial tonearm
was the rule until several manufacturers (re-)discovered the benefits
of parallel tracking in the LP era and started to design arms which
would open up the full potential of the LP record, especially of the
stereo LP. |
 |
|
EXPENSIVE |
 |
|
CUTTING
LATHE |
 |
|
DIFFERENT
ANGLE If a common, pivotal arm is used, only in two instances there is zero tracking error. The tracking error results in distortion because of the time difference there are actually two readings from the groove, especially when elliptical, shibata and other fine line tips are used. The human ear is very sensitive to irregularities in the time domain of any signal, be it digital or analog. A tangential arm has the least distortion because the tracking error is minimized to practically zero: the diamond tip of the cartridge reads the two groove walls at the same time without the delay. And there is another important factor: there is no centripetal action The tangential arm does not need side thrust (bias compensation). The drawing shows an exaggeration of the mistracking of a radial arm versus the action of the cutter diamond and the reading of the groove by the diamond tip in a tangential arm. |
|

|
MISALIGNING
THE CARTRIDGE If
this is not the case, it makes no sense to use a tangential arm. Although
the deviation will be less severe if compared to the result of a radial
arm, one should use the tangential principle to the full. |
|
| REK-O-KUT
CHALLENGER DISC RECORDER The Rek-O-Kut Company proposed a portable professional disc recorder and playback phonograph for 33 1/3 and 78 rpm disc cutting. An accessory idler wheel could be mounted for cutting at 45 rpm speed. A constant speed, hysteresis motor was the driving force of the table and arm. It had interchangeable leadscrews for standard as well as microgroove recordings. The amplifier measured a frequency response of +/- 1 dB from 30 to 20.000 cycles. It had controls for bass and treble. Recordings could be made from radio tuners, tape recorders, and other signal sources. At right part of an advertisement which appeared in 1953 High Fidelity magazine. |
 |
|
Added on July 23, 2014: Today I discovered in a newly acquired edition of High Fidelity Magazine, January 1956 edition, an advertisement by a company named Audio Specialties, 13167 Steel Avenue, Detroit 27, Michigan. They were the manufacturers of the TRULINE Reproducer Arm. It is an advertismeent that I did not come accross in earlier editions nor in later ones. So it is not sure if the product was sold in large enough quantities to establish itself on the market. At right you see the ad. The TRULINE is a tangential tonearm that came in two versions, a binaural one and a single (one cartridge) version. It had been on display at the New York Audio Fair. There the COOK LABORATORIES Exhibit showed the Binaural version. And at the ELECTROVOICE exhibit the monaural (single cartridge version) was used to demonstrate ElectroVoice's NEW Model 84 Cartridge. The
ad lists all the advantages of linear tracking. The price for the
Binaural Tonearm was $ 49.50. The Monaural Arm sold for $ 7 less at
$ 42.50. See also
Be on a Straight Line with Trueline
|
 |
|
ORTHO-SONIC
V/4 |
 |

BURNE
- JONES |

|
| MARANTZ An early and nice specimen of a turntable with an integrated tangential arm was the Marantz SLT-12 (when Marantz was still Marantz). It was a 2-speed turntable with a lightweight cartridge without counterweight. It was also available with a heavier arm with balance weight and universal mount for playing with other (heavier) cartridges up to 10 gr. of weight. The arm had no servo system and therefor did not always function as desired. This edited picture on the right is originally from an advertisement in High Fidelity of 1966, but the Marantz SLT-12 was already introduced in 1963. |
 |
| PIERRE
CLEMENT Very ingenious and quite modern at the time was the tangential arm devised by Pierre Clément from France. He received a patent in 1968 from the French National Institute of Industrial Property: "Procédé et dispositif de lecture d'un disque de phonographe le long d'une trajectoire rectiligne." The use of the light bulb and the photoelectric cell has inspired many a designer. As soon as the arm moves out of the 90 degrees position, the light beam will no longer be interrupted by the small plate at the end of the arm. Then the motor will receive current and starts to turn the worm on which the carriage rides. The carriage is moved towards the spindle until the light beam is interrupted again and the arm remains at 90 degrees. See |

|
|
RABCO
ST-4 TURNTABLE  |
 |
|
HARMAN
KARDON ADVERTISEMENT |
Harman Kardon ST7 |
 |
 |
|
GARARD
ZERO 100 SB The arm of the ZERO 100 worked along the same mechanical principle as the earlier arm designed by BJ (Burne & Jones). The ZERO 100 was introduced in 1971 and eventually came in various versions: C, 92, SB, Z. The arm had its flaws. The solid mounting of the cartridge in the head shell was not possible as there are too many pivots allowing the wand and head shell to adept during play. At these points resonances occur, already at relatively low frequencies. The result is that the harmonics of these resonances are generated and do influence the frequency characteristic. In short: there is increased distortion. In pick up arms the pivot is designed in such a way that there is the least play and the least friction (1). The problem with the Garrard ZERO is that it has three more pivots (2, 3, and 4). These extra pivots should not add friction. Therefore they are adjusted in such a way that they have free play. |
Garrard ZERO 100 SB |
| LENCO
SWEEPER Designing and manufacturing a tangential arm is not as simple as may seem and only thorough engineering can result in a good functioning device. Proof is the only tangential arm Lenco could come up with and then even the geometry is not right. The cleaning brush does not follow the groove correctly because it is incorrectly positioned. Nothing to please Inspector Gadget. |
Lenco's Tangential Sweeper |
| REVOX Revox too developed turntables with tangential arms: B 790, B 791, B 795 and B 291, all with a direct drive motor. But since the arm was very short, it was only suitable for the high compliance moving magnet cartridges which were en vogue in the 1970's: ADC, Stanton, Pickering, Shure, Goldring. |
Revox B 795 turntable with the ultra short 'Linatrack' arm, hidden in a rectangular housing which had to be "set aside" in order to be able to put on a record and to take it off. |
|
ACOUSTICAL
TANGENT ARM |

Acoustical "Tangent", predecessor of the Bang & Olufson series. |
| BANG
& OLUFSEN Bang & Olufsen used tangential tracking since 1974 first in the Beogram 4000 and they refined the technique of parallel tracking each time they came up with a new model. There were many series of integrated turntables like the Beogram 3000 (the successor of the earlier 3000 which was a Thorens TD124), 1102, 4002, 5005, 6002, 8000 and 9000. At right Beogram 4002. |
 |
|
MITSUBISHI BALANCED
PLATTER
THREE
BELTS AND ONE THREAD VERTICAL
POSITION |
The
clever engineering of the belt drive Mitsubishi with |
| PIONEER To give a new boost to the sales of turntables, knowing that the Compact Disc would soon be introduced, many manufacturers came up with newly designed tangential turntables. In 1980 Pioneer presented a very clever tangential arm system for their PL-L-1000. The arm is transported electronically by the interaction of magnets and a long coil: electromagnetic suspension. Exactly like the Maglev Train (magnetic levitation) a technique initiated by the German engineer Hermann Kemper in 1922 and first applied for the Magnetschwebebahn. |
 |
|
TECHNICS Also Matsushita launched a series of tangential turntables: SL-5, 6, 7 and 10. In these turntables the arm was incorporated in the lid. At right the SL-10 which was introduced in 1980. |
|
|
GOLDMUND Like
B&O, Goldmund does not use micro switches as Rabco does, but applies
detection by a photocell. Today there are many designers of tangential (=parallel tracking) tonearms which can be fitted on a variety of turntables. |
Goldmund T3F Automatic Tonearm with 2 separate motors for lift and transport. A second arm which is fixed at the base of the carriage, at an angle of 90 degrees, has a photo electric cell at its end which senses the slightest deviation. |
| DIY In the DIY department there is Poul Ladegaard's air bearing arm which keeps inspiring many a hobbyist to build a tangential arm. In the audiophile section there are the arms of Clearaudio, Forsell, Rockport and Airtangent. |
|
|
MUSIC
MAKER CONDUCTOR The text explaining the benefits of the arm read: "'Forget the issues of cartridges mounted on carriages on wheels, or high pressure air pumps through ceramic bearing housings". |
 |
|
It is amazing in this age, in which the digital format is constantly reinvented, that the sound reproduction of analog recordings is brought to an even higher level. The arm has no servo system. The arm base rests on a thin cushion of air and this does not generate friction. The arm just moves by itself when following the groove. |
The Cartridge Man's Conductor Tonearm. |
|
HIGH
END / HIGH PRICE |
Martin Bastin's Garrard 401, The Cartridgeman's Conductor arm and Music Maker III cartridge. |
The Rabco SL-8 / SL-8E
|
|
TWO MOTORS The SL-8 and SL-8E have two motors. One for lowering and lifting the arm wand. The second motor, which ois the carriage motor is hidden in a cast aluminum housing together with the electronics and the 1.5 Volt battery. This motor is a stepping motor which can turn just a fraction of a degree. The image of the rear shows the RCA female connectors which of course can be replaced with up to date items from Cardas or WBT or any other high quality brand. The signal wires (shown at left in the photo) are bound together with the electrical wire feeding the lift motor. These wires do not obstruct the movement of the arm nor is there any influence of the electric lead on the signal wires. Arm wire and signal wire of course can also be replaced by a modern OFC wire, although I did not do that (yet). |
 |
| LIFT
MOTOR The ingenious lift motor only comes into action when the yellow lift/lower switch is pressed down (for a second or two) and automatically at the end of the record. |
 |
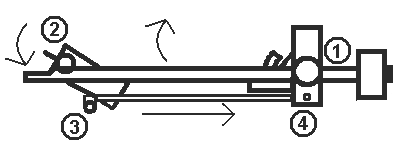
| SERVO
MOTOR This drawing at right shows the principle of the servo system which works with micro switches. The servo motor is activated by the movement of the arm. When the arm follows the groove, the Vertical Contact Pin A (black spot at the end of the side bar) moves towards the Carriage Motor Contact Strip B (as I call these for convenience) and will eventually touch that strip and make contact. Now the carriage motor comes into action and moves forward while the cartridge needle remains in the groove. The carriage is moved until the angle between arm and groove is 90 degrees again. At that moment A ceases to make contact with B. Every time when there is a slight deviation, A will come into contact with B, and the carriage will move until the position is corrected (A does not touch B any longer). Contact Strips B and C are flexible. |
 |
|
POWER-LIFT
In other words, The movement to lift the arm (A-C) has to be significantly larger than following the groove (A-B) of the disc. Only if the distance between the micro switches for correction and that for lifting the arm (B-C) are too close the arm will lift during normal play. |
 |
|
WHAT
TO DO FIRST? Before you start dismantling the arm and adjusting whatever you think is necessary to make it function allright (if you have the appropriate instruction manuals), first do the following. Put in the C cell battery. Lower the arm by pressing the yellow switch. Take out the battery. Now you can move the arm freely in the vertical and horizontal plane. Take the complete arm assembly off the base and turn it upside down. You can spray the micro switches with the special Tuner Contact Spray (used for the variable condenser) which does not leave a residue. Move the arm wand several times in the horizontal plane. This will "clean" the micro switches. Put the arm assembly on the base and put in the battery. Check if the arm will function as it should. If not, repeat it one more time. In many cases this procedure will help. The micro switches will make contact and the arm will behave as it should. If this does not help, you may want to disassemble the arm. check the functioning of the micro switches, clean all parts at the same time, and adjust the bead chain, motors, etc.... if necessary. But for that you would probably be better off if you had the trouble shooting manual. |
WHAT TO DO FIRST?
|
 |
 |
|
C
CELL BATTERY |
|
|
MAXIMUM
ERROR If
during play the arm shows a deviation before its position is corrected,
it will be necessary to adjust the Vertical Contact Pin A and check
if Contact Strip B is in place or has a bend. The
materials of Strips and Contact Pin are well chosen and provide full
electrical contact even after more than 30 years. |
|
|
SWITCHES
|
 |
|
THEORETICAL |
|
| OPTIMUM
LENGTH OF ARM Making the arm longer postpones the moment of correction. The error increases with the length of the arm. A longer arm than advised would mean that the distances between A and B and A and C have to be narrowed. The result should be that the angle is corrected in time. In that case the mechanism with the micro switches should be placed away from the rail, closer to the cartridge, that is quite a distance towards the spindle. This can only be done by adding a bar parallel to the arm as Goldmund and B&O did. But such a construction is for the knowledgeable hobbyist only. |
 |
|
MASS
OF ARM AND LENGTH OF ARM WAND |
|
|
UNIQUENESS
REVIEWS "Without question, the Rabco arm does what it is supposed to do, and does it nicely. ...minimized record and stylus wear, superb reproduction." The following paragraph is from the review in an issue of High Fidelity Magazine: "Extremely well engineered, unprecedented low tracking force, no skating effects, minimum groove wear. ...ruggedly constructed: after months of continuous use the SL-8 remains as responsive and foolproof as when first installed."
|
|
|
JONAS
MILLER SOUND
Various experts have proposed alterations and optimizations of the Rabco SL-8 in order to reduce the mass of the arm, to suppress and avoid resonances in the metal housing, and thus achieved a better reading of the signal. Jonas Miller of |
 |
|
AUDIOETC DAVID
C. SHREVE |
|
| TUNING
THE DIABOLO KNOB If the carriage motor keeps on turning after the arm has been lifted and rests on the diabolo shaped knob, this of course means that Pin A still touches Strip B. If you have adjusted the arm for zero tracking error, then the diabolo shaped knob could need a final adjustment. In the drawing at right you see that the thickness of the washer determines the position of the arm when resting. By placing a thinner washer in between the knob and the arm assembly, the distance (Y) becomes shorter (=X) so that Pin A does not touch Strip B any longer. These adjustments are in principle not necessary if the arm is in the condition it was initially sold. But in time the precise functioning may not be so precise any longer. So checking and verifying is necessary. |
 |
Rabco
Arm Wands
|
It
is not clear whether the SL-8 had a one piece arm as a drawing in
a magazine review showed. Could be that the two part design was omitted
in the drawing. Whatever. The arm is a two part adjustable arm, the
connector being the third element.
|
The measurements are given for those owners of Rabco arms who want to restore an original arm tube or reconstruct an alternative for modified arm wands while using the original connector. |
 |
The measurements are given for those owners of Rabco arms who want to restore an original arm tube or reconstruct an alternative for modified arm wands while using the original connector. |
 |
How to go about if you want to make an armwand which has less mass and would better suit the cartridge you use better as far as weight and sound are concerned? There are several suggestions for using balsa wood. But just pure balsa is in my opinion not suitable. It is soft and therefor less firm. My experiments have shown that the combination of aluminum strips and balsa make an arm or armwand stronger and does influence the frequency characteristic and transient response in a positive way. I do not guarantee that the suggestion pictured in the drawing at left gives the results you desire. But the drawing indicates a possibility and shows along what lines you could think. The amount of aluminum (large width or narrow, weight and thickness) determines the effectiveness and the final sound quality and dynamics. So some experimentation should be done. |
 |
At left is an image of the arm wand proposed by David Shreve built of two layers of balsa and a magnesium block which holds the nylon threaded bar. - Picture Copyright David Shreve. |
 |
This drawing explains the construction of the arm wand proposed by David Shreve. It is made of a thin upper layer and a thicker base of balsa wood. The lift wire has to be adjusted carefully. The original connector is omitted and makes place for a magnesium block with threaded rod of nylon. - Drawing Copyright David Shreve. |
Technics SL1100 with Rabco SL-8E and Universal Record Stabilizing Ring (RSR) plus Universal Stabilizer Weight.
© Rudolf A. Bruil. Page first published January 8, 2004.
 |
 |
The
Rabco came well packed in a large box with the Serial number written on the
top.
At right the relatively short but in length adjustable arm can be seen, the
wooden strip (shim) and
two triangular wooden parts to be used when the Rabco SL-8 or 8E will be mounted
on
a Thorens TD-150 or TD 125 or later model of which the armboard is too short
to accommodate the arm without being obstructed by the plinth.

Audio & Music Bulletin | DIY Tonearm | The Universal Record Stabilizing Ring |
25 Years CD - Digital Audio Compact Disc
Record Cleaning Service | The Remington Site | Links | Webmaster |
Ortofon/Decca/Tannoy Cartridges |
|
|
 |
|